Installation

We encourage you to familiarize youself with the safety code and this manual.
Unpack the UNIFlash USB v2f floppy emulator and your musical instrument, hereinafter referred to as the instrument.
If the cover is present on the floppy drive, remove the cover from the floppy disk drive.
Slacken and remove the screws on the lower cover, turn the instrument upside down, put the instrument with the keyboard toward you and open it with care.
Disconnect the informational flat cable and power cable from the 3.5' FDD.
Remove the FDD with care.
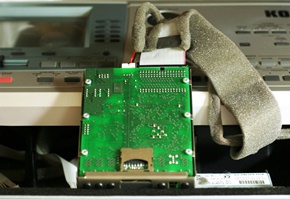
Place the Uniflash USB v2 instead.
Connect information cable, connect the power supply.
Check again if the installation of the unit is correct.
Reassemble your instrument and turn it over.
Please, see below how the unit functions.
The memory card space is divided into banks (virtual diskettes). Each bank corresponds to one virtual diskette and has a capacity of 1.44 Mb, for example. The capacity of the banks depends on capacity of the memory card. The maximum number of the banks is 999. The current number of the bank is displayed on the LCD/LED panel and is selected by the buttons near the LCD/LED panel. The FLOPPY message on the the LCD/LED panel indicates the access to the synthesizer's FDD. The numbers 001...ХXХ correspond to the banks (virtual diskettes). The right button increments the bank number, while the left one decrements it. Simultaneous pressing of both buttons results in transition to FLOPPY or Bank 001. The blinking LCD/LED panel means, that the selection is accepted. A flashing point indicates access to the Floppy Emulator UNIFlash USB.
See below how to make sure that your unit operates properly.
Turn on your instrument.
Format any bank.
Check if write protect feature is available.
Save information to the bank.
Read the information from the bank.
Make a copy to another bank.
Complete the assembly of the instrument.
Enjoy it and have fun!
← Back to Section


